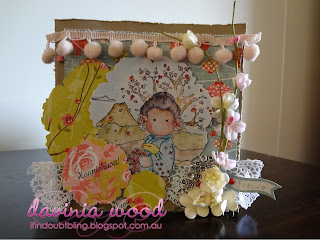
Sunday, June 30, 2013

Tomboy challenge DT card for Totally Tilda!


Hiya guys...well what a week! my FIRST ever DT card and I am finding my way round slowly with the lovely help of the girls at Totally Tilda. Thank you to Mummy who has helped me patiently and kindly in getting the bits and bobs right.

Our Sponsor for this challenge is the fantastic - Bunny Zoe's Crafts Bunny Zoe's Crafts

gif maker
 
 
And the prize is!


So the challenge is Tomboy- NO PINK! So for this card I had to crack out the gorgeous Pirate Tilda. For this card I used the dark grey cardstock from Kaisercraft. I then roughed up the edges with my distressing tool on not only the card stock but the Design papers too which are the Kaisercraft 'Vintage Timeless' collection. This collection has a weathered/old look to it, like what an old map would look like.

I then stamped Tilda and coloured her with Distress ink- my colour combo is-

Skin- Tattered Rose/Tea Dye
Tee shirt- Chipped Sapphire/Faded Jeans
Pants- Scattered straw/Mustard seed/Tumbled glass
Sand- Scattered straw
Hat- Tumbled glass
Sail- Spiced Marmalade
Boots- Frayed Burlap
Ship- Walnut stain
Grubbiness on Tilda- Tea Dye

I added some of the Martha Steward glitter to her earrings. Tilda is sitting on Make It Crafty Treasure chest and in the background you can see her ship from the same range at Make It Crafty. I again used glitter and perfect pearls to let her 'pieces of eight' shimmer. Then I glittered a Srap FX embellishment (the sword) and places it at the top corner. Added to this before all glued down is the cheese cloth in the back which reminded me of something shipwrecked. Then this awesome ribbon and bow from Papermania's 'Portobello Road' collection. Then Ranger Stickles in 'Black Diamond' to Tilda's patch and flag of her ship.

I then added a charm to it in form of a skull and cross bone. 

On the inside I embossed a Parrot from the Magnolia range and the Message in a bottle also from Magnolia. I then cut the letters from the Timeless Collection paper pad and spelt out 'Tilda Sparrow' down the side. I thought since she is a Tomboy and a Pirate at that then she should be a bit grubby!

And there you have it...my very first DT card!

Hope you likey!


Love D xx


So come on guys and pop across and join us at-
 

Monday, June 24, 2013

Special occasion/ inspired by a Christmas song/song

Happy Monday blog people!

Now another week and another great challenge from the gals in blogland! This week I am doing Christmas card...what a surprise eh!

The blog challenges I am entering with my easel card are-

Tilda's Town- Special Occasion
Time for a Magnolia Challenge -Inspired by a Christmas song
Totally Tilda- Song

So first I thought I best tell you what song my card is inspired by- 'I saw mummy kissing Santa Claus' thought it was a bit different but was always a fave in our house when putting the decorations up!

So for the card I used Bazzil Bling card stock in Red Carpet. I love the way this shimmers and this range has to be one of my faves.  For the design papers I used 'Twigs and Berries' from the Kaisercraft range. It is a lovely metallic background. I used the Lifestyle crafts Nesting 4 die to cut a range of shapes, so they stepped down to reveal the paper behind.

The stamp I used is 'Tilda blowing kisses' I love this stamp as a) only time you really see a hint of Tilda's mouth and b) I love the delicateness of her eyes. I thought this was perfect to attach flatback red hearts to the hearts she was blowing. I then adhered some Ranger Shaved Ice (this is everything I LOVE in a tub!) to give the impression of the magic of blowing kisses. Since my song is 'I saw mummy kissing Santa Claus' I used some of the awesome Dress it up buttons to show Santa and some Mistletoe. I also then stamped out the Magnolia Santa hat

I coloured Tilda in Distress inks- here is the combo I used-

Skin- Tattered Rose/Worn Lipstick
Dress- Shabby Shutters/Forest Moss
Socks/hat- Fired brick/Barn door
Hair- Rusty hinge/wild honey
Wings Weathered wood

I then used some Kaisercraft red flowers and this also helps prop the card up. Before I glued the pieces of card together I added some green ribbon behind the stamped image and cut some snowflakes using my Bug. I added some of the smaller snowflakes to the base of the card. I then added some white lace and some thicker red lace to the image.

Now the exciting bit! A while back I bought a Snow marker and thought perfect card to try it out on. This is a pen that you shake (cap on peoples!) and then dab on your card. Leave a few seconds and then heat and magic it fluffs up and you get the impression of snow! I LOVE this !!!! So as you can see I have used it on the base of the card round the flowers. The finishing touch was a sentiment die card to write your message one and adding some bling with Stickles 'Diamond' glue.

So here it is! This card was made for my parents back in England!

Love D

xx


Monday, June 17, 2013

Anything goes!/ Song!/ Use your stash!/ two stamps or Doohickeys

Hiya gang!

Happy Monday!!! So its another week and some more awesome challenges from the gang in blogland!

With this card I shall be entering the following challenges;

Tilda's Town- Use your stash
Totally Tilda- Songs
Magnolia Down Under- Anything goes!
Marvelous Magnolia- Two stamps or Dies


Now how awesome are these! Love the way they push us into creating such different things!

Now for this card I have used Japanese Tilda and The Japanese tree of luck. I just love this combination and think Miss Tilda just looks so darn cute!

So for the main body of the card I used Kaisercraft basic card stock in 'Latte'. This is one of my fave colours to use as it allows the design papers that you use to 'pop' against the neutral background. Design papers, now from my stash I have used Basic Grey's collection ' Konnichiwa'. I saw this collection on Scrapbook Boutique a while back and couldn't resist it....along with its awesome brads and buttons. Although in this project I have just used the brads. 

I stamped out my two images and then used my die from Spellbinders. The die I used is the flower die, it ties in nicely with the Cherry Blossom on the Japanese tree of luck stamp.  I then used the same die and the smaller one to cut out the design papers.  I coloured Tilda with Distress inks- here is my colour combo-

Hair- Dusty Concord/Soot
Skin- Milled Lavender (I used this first as I wanted to give her a Geisha look), Tattered Rose, Worn    Lipstick
Kimono- Broken China/ Tumbled glass/ Mustard seed
Mountain- Brushed Corduroy/ Shabby shutters/Forest moss/Frayed Burlap
Sky Tumbled glass
Flowers- Worn Lipstick/ Barn door
Chopsticks- Spiced Marmalade

I then used lace from my on stash to add some texture to the card along with the lovely delicate pale pink pom pom trim that reminds me of the cherry blossom tree my parents  have back home in England. The flowers are from Prima 'Fairy Rhymes' and my own personal collection. I then used Rose pink Rhinestones to add a bit of bling. Finally I added a blossom charm to set it off, and a tag saying 'Sakura' which is Japanese for Cherry Blosson. On the inside, I used Ranger detailed black embossing powder to emboss a image of a bonsai and some Japanese lanterns. 

Now did I have fun with adding a song title to this card! I spent a while and I finally decided to go with 'Beneath the Cherry Blossom Tree- a song for Japan' by The Producers heart and soul. This song was created in support for the millions that were and still are affected by events in Japan.

So guys here is my card!

Love D xx


Sunday, June 09, 2013

Postal/Thank You/Anything goes!

Happy Sunday crafters!

Well its a peaceful Sunday in the 'House of Bling' so while its quiet and its just me and the hermit crabs and hubbys at work I thought it was a perfect time to set to and get on with the card for 3 challenge blogs/ The challenges I am entering with this card are-

Magnolia Down Under- Thank You
Totally Tilda- Going Postal
Tilda's Town- Anything goes

Now as I was thinking of this card I was listening to Frank Sinatra and his song about Paris was playing on the IPOD so this is why this card has a Parisian feel to it. For the stamps I used Tilda in Havana, Brick wall, Café chair and table.

I used basic Kaisercraft card stock in 'ballet' which is one of my fave colours. I thought nice chic muted tones for this card. The design papers I used are from  Creative Imagination collection 'Gallivant'. I used this as it has postcards, postal marks and stamps in it. Plus it is a gorgeous colour palette which went well with the 'ballet' cardstock. I distressed the edges of all the parts of the card, I like that vintage look. I then used the following dies -

Magnolia Doo hickey- vintage tag
Magnolia Doo hickey flag an cloud- I only used the flag and cut it 5 times out of Gallivant paper
LLLC -Eiffel tower
Lifestyle crafts - Sugar Cookie Alphabet Die

These were then placed around the card to add some extra dimensions. The tag has some shabby chic ribbon from 'Live and Love Crafts' tied through. Before I added my image I used velvet ribbon in Rose Pink from Ribbon Girl behind and also tied a bow in the same ribbon.

I stamped and masked the stamps to create a Parisian café theme. I coloured this image in Distress ink in the following colours-

Skin- Tattered Rose/Spun Sugar
Hair- Mustard Seed/Scattered straw
Dress- Victorian Velvet/ Aged Mahogany
Hairband- Dusty concord/Pin Needles
Table/Chair- Scattered straw/Pumice stone
Table cloth- Milled Lavender
Cup/saucer- Tumbled glass
Brick- Brushed Corduroy/ crushed Olive
Path- Bundled Sage

Some paper flowers in ivory and rose pink were attached. I then added the die cut letters to the die cut flags to form the word 'Merci' for the Thank you aspect of the card for the MDUC.

I added a Eiffel tower charm and a postcard charm. Added some Perfect pearls to make Tilda's necklace stand out and then added to Bling in the form of rose pink rhinestones from KC.

I hope you guys enjoy my card!!

Love D xx


Saturday, June 08, 2013

Totally Tilda DT card

Hey there guys!!!! Hope we are all well today?

Well today I have submitted a card to the 'Totally Tilda' challenge blog for their DT call. I would LOVE the chance to join such a DT team. So as they asked, going to tell you and them a little about me.

Well I am an English girl (Geordie- Why Aye Pet!) living in the Pilbara in outback Australia with my fantabbdosey hubby, who is a Yorkshire man.  I just love to create things! I love sparkle and glitz and  love learning new techniques and trying them out in my own little style. My style is vintage and I LOVE colour. I colour with Copics and also Distress Markers and have just started with watercolour pencils.  Why would I fit in well with your blog.. well I am Magnolia mad, whether it be their stamps, embellishments, paper,or magazines you name it I love it! I love making scenes with them and just experimenting with them. I haven't belonged to a DT before, although I am a guest designer in October on Magnolia Down Under, and I am super excited for it. I would love to be part of a design team! I am dedicated and can hit deadlines no probs.  Also, I like to laugh. I have a good sense of humour and can laugh at myself easy- hey with this accent in a small town, and with the advent of Geordie Shore you can imagine cant you lol! I am easy going and love to meet people.

So the challenge was to design a card with our take on summer. Well summer to me here is totally different to what I had back in England! Also, we got married in Summer 2011 when it was 40 degrees and humid. Us lot who live up here have a very tropical climate and we have the most darling place called 'Coral Bay' where we head to which is on the coast and its bliss. Clear blue waters, sand, snorkeling and just chilling out. This is what was the inspiration behind my card. We had our honeymoon in Coral Bay and it was bikinis and chilled out beach time. Also the flowers there are a riot of colour- Frangipani's in every colour, and we even planted 3 back here in Tom Price. So I took the colours from there. I used the Kasiercraft collection Tropicana and used some ribbon roses in Pink and aqua and also used the Prima flowers from the 'Fairy Rhymes' collection. Nestled in the flowers on the bottom of the easel card is a little starfish. I coloured my image in Distress markers. I hope you enjoy my card as much as I enjoyed making it.

Love D xx


Thursday, June 06, 2013

Anything goes challenge!

Hi there craft fellows!

Well the lovely people at two of my fave blogs have thrown up the same challenge! Anything goes! woohooo got to love it as get to see lots of different things! So the challenges I am entering in are

Mid Week Magnolia's- Anything goes- frontage/vintage element option
Marvelous Magnolia's- Anything goes

So here is my card!

As usual I used the lovely plum coloured basic cardstock from KC for the body of the card. I also used their old retired collection '13th Hour' as this is a lovely spooky range from them.  For this I used the masking technique a few times to make a spooky scene- I first stamped Tilda as a devil and then masked her and stamped my fave (weird probably!) the tombstone. So it looks like she is sitting on it. Then masked the pair of them and stamped the mushrooms, this was then masked and Edwin which I LOVE as a mummy to finish the spooky theme.

Now I have just started using the Distress Inks, they are AMAZING! So here are the colours I used!

Skin- Tattered Rose/Worn Lipstick/Tea Dye
Dress- Spiced Marmalade
Wings/sock- Fired Brick/Barn Door
Tomb stone- Crushed olive/ vintage photo/tea dye
Edwin- weathered wood/pumice stone
Grass- pine needles/crushed olive/scattered straw

I like to have a bit of a colour wash in the background so for this I used 'Broken China'.

I then distressed the design papers and added some 'Seedless Preserve' to the edges. I then added a dark red ribbon, and frayed the ends. Added to this was some purple lace from Bo Bunny. Then some KC purple rhinestones.  Underneath you will see poking out, a red feather, just to add some texture to the card.

I then added some pale purple lilies to the card and a haunted house charm.


Now of the inside I used the mushrooms again and stamped them then embossed them in 1) Ranger Holographic powder and 2) Ranger fine detail black powder- just to carry the poison mushroom theme through from the front.

So here it is! Hope you like it

Love D xx


7kids college fund blog challenge- JUST WRONG!

Hi guys!

Well I could not resist this awesome challenge that the guys at 7 kids college fund has presented us...not very often at all do we get the chance to just go plain old weird! so it had to be!

For this card I used the Magnolia stamp 'loving wedding couple' and the wedding arch. I was inspired by the awesome zombie card that one of the DT member created and I am loving the Halloween/spooky collection stamps and being able to create a scene. SOOOOO... I stamped out the wedding couple ...minus their heads...and then stamped the heads on to a separate piece of water colour paper.  I then cut the heads out and saved for later. I masked the couple and stamped the arch way round them. Then masked the bottom half of the arch and stamped the tomb stone stamps to each side. This is my gruesome couple wedding. Even the undead can fall in love!!!

I then set too and coloured my images with Distress Markers- here are the combos I used-

Skin-  Tattered rose/ Pumice stone (for the ghostly pale look)
Dress- Antique Line/Barn door
Suit- Weathered wood/Barn door
Hair- scattered straw/Barn door
Tomb stone- crushed olive/tea dye
Grass- pine needled/crushed olive/scattered straw
Arch- Vintage Photo/Tea Dye
Flowers- Black soot/ Burned concord
Leaves- Scattered straw/crushed olive
Path- Tea Dye
Blood- Barn door/Fired Brick

The colour I used behind the image, to give it a spooky sky is the Distress ink pad in 'Seedless Preserve' and just used a number 4 brush to wash this behind and around the image.

For the body of card I used KC cardstock in Plum and also in charcoal. I then took design papers from the KC old range '13th Hour' and for all of these including the image itself I distressed them and edged with the 'Seedless  Preserve'. 

I also used Seedless preserve and Black soot to dye some white rose to suit my colour combo. I added some purple ribbon behind the image. In the background you can see some material called 'Spiders wed' which can be pulled and pushed and make some love depth to a card.  This is in pale lavender.

Finally I added some KC sparklets in Ebony to add that bling factor. And then for a  sentiment. My hubby came up with this one 'Don't lose your head at the wedding- in reference to Tilda and Edwins heads being near the tombstones! I chose a purple die cut and in Distress Marker 'Picket Fence' wrote it on the die.

And there you have it my weird/zombie/creepy card!

Love D xx


Tuesday, June 04, 2013

Celebrate/ Bling it baby!

Hi guys!

greeting from a wet Tom Price!!!

Well I have been working hard at my Distress inks and decided that the challenges this week were going to be coloured in them. Wish me luck! The challenges I am entering this card in are as follows

Tilda's Town- Celebrate
Magnolia Down under challenge- Bling it!

So sit back and enjoy!

Now I chose for celebrate a happy wedding anniversary theme for my parents who have been together since they were 14 and been married since they were 19/20...they are now 65 and 66!

For this car I used the Bazzil bling paper from the card body- String of pearls which is my fave and gives this lovely shimmer vintage look to the card. For the 2nd layer I used the Lipstick version of this which is a gorgeous almost vintage rose pink and offsets the cream lovely.  I then went for the Prima range that has not long been out called 'Fairy Rhymes' and this is one of my all time fave collections. I distressed the edges using my distressing tool. I then layered the 'Lipstick' paper on top of the 'String of pearls' and then added some of the 'Fairy rhymes' to add the flower feel. I thought this went well as I was using the bridal arch way.

Then on to the stamping. For this I used the Archival 'Jet black' ink pad which is a waterproof ink. I then masked the loving wedding couple by Magnolia and stamped the Bridal arch way over it. This is the colour combos I used-

Skin- Tattered Rose/ Worn lipstick
Hair (bride) Scattered straw/vintage photo  (Groom) Spiced Marmalade/Fired Brick
Dress- Aged Mahogany
Suit- Stormy Sky
Sky- Broken China/Spun sugar
Grass- Pine needles/crushed olive/peeled paint
Archway- Brushed corduroy/vintage photo/frayed burlap
Flowers- Worn lipstick/mustard seed/crushed olive/pine needles

I then used my sugar cookie die from Lifestyle crafts and die cut the words 'Happy Anniversary' in Lipstick card stock. To keep with the love theme/bling I inked spun sugar over and love always sign and a you and me sign. The first is on the outside, the second on the inside. I then used Fairy Rhymes flowers to decorate the corner of the card.

Now for the bling! I used the KC sparklets in pink and used this on the Love Always sign. I then added some pink lace to the top and KC mini pink pearls.  Magnolia ink chandelier pink bling was used to embellish the top left corner and in the bottom right I added 3 rose pink rhinestones. Finishing touches was a charm saying Love and some tiny rose pink earring for Tilda the bride.

So much bling it sparkles! So please raise a glass and celebrate my parents wedding anniversary1

Love D xx